NICE Spinbus SN6041 – standalone drive for garage doors
| Product availability: | Sale ended | Unfortunately, the product is no longer available for delivery. This does not mean it will never be available again, but at present, it is not expected to be offered for sale again. |
|---|


Description of NICE Spinbus SN6041 – standalone drive for garage doors
NICE Spinbus SN6041 gate opener is designed for sectional garage doors with an area of up to 17,7m2, or up-and-over garage doors that protrude outward with an area of up to 14,7m2, or up-and-over garage doors that do not protrude outward up to 13,5m2. Which is which? Has a mechanical stop switch. The opener is non-reversible. Detailed technical specifications ». Download the manual ».
(Is this opener right for me?)
Compare with other openers:
| « Less powerful opener | More powerful opener » |
|---|---|
|
|
No. |

This product—the NICE Spinbus SN6041 garage door opener (our code NICE-SN6041)—includes:
- electromechanical NICE Spinbus SN6041 gate opener with control unit SNA4. The opener is supplied without a receiver.
- installation manual
Discounted bundles containing the opener NICE Spinbus SN6041:
| Opener kit with accessories » |
|---|
|
Spinbus SN6041 opener, SNA4 control unit, SMXI receiver, FLO2RE remote control, SNA30 guide rail. |
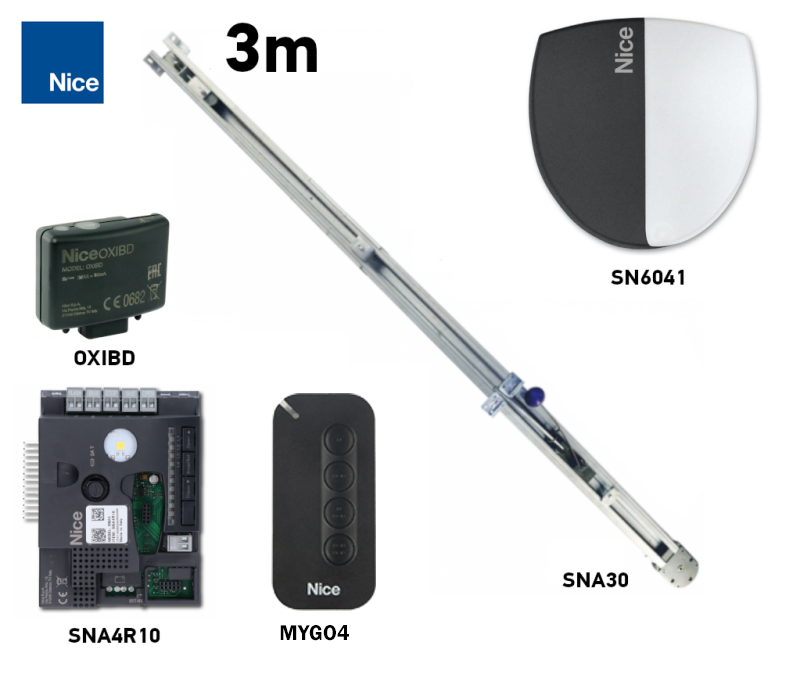
The opener is compact, safe and practical, ideal for both residential and commercial use. Durable plastic housing with integrated lighting.
The opener is suitable for automating garage doors with a door area of up to 17,7m2 for a sectional garage door, 14,7m2 for a protruding up-and-over garage door, or 13,5m2 for a non-protruding up-and-over garage door. Types of garage doors. These values apply under the conditions specified by the manufacturer, such as weather conditions, temperature variations, door rigidity and, above all, smooth door operation. These conditions cannot always be achieved or controlled, so we recommend using the NICE Spinbus SN6041 opener for garage doors at no more than 80% of these values. See the Choosing a gate opener chapter for more information.
Very user- friendly technology BlueBUS allows you to power and control up to 6 pairs of photocells using a two-core cable. The opener also features a thermal fuse.
Adjustable speed,, force and pause time for the opener's automatic closing and more; see Programming.
Diagnostics using warning beacon.
In the event of a power failure, the opener can be released so the gate can be operated manually. It is also possible to connect a NICE PS124 backup battery, which allows the opener to perform several cycles during a power failure.
The opener's control unit has a programmable input, to which the following can be connected warning light, a gate-open indicator, an electromechanical lock, or an electromagnetic lock.
Opener NICE Spinbus SN6041 is an electromechanical opener suitable for Slovakia’s climate and compliant with all European safety standards.
Accessories compatible with the NICE Spinbus SN6041 opener
We also recommend purchasing compatible optional accessories for the opener, or choosing one of the pre-assembled discounted kits:
| What | Why | Type |
|---|---|---|
| Warning light | The warning light signals gate movement by flashing—ideal for driveways with limited visibility. It also has a built-in antenna for greater remote-control range. | |
| Photocells | When closing, they detect obstacles and stop the gate, preventing it from hitting vehicles or people. | - MoonBUS (MOFB) |
| Transmitter |
For remote operation of the gate. |
- FloR (Flo2R-s, Flo4R-s) |
| Receiver | Required for remote operation of the gate. | - OXI - SMXI |
| Antenna | For greater remote-control range. | - built into the warning light LUCYB, MLBT - ABFKIT antenna only, or ABF |
| Keypad | If you forget your remote control, or if many vehicles or people visit and you don’t want to give everyone a remote or open the gate yourself. | - MOTXR |
NICE Spinbus SN6041 opener manual
Download the NICE Spinbus SN6041 opener manual here:
NICE Spinbus SN6041 opener manual

NICE Spinbus at a glance
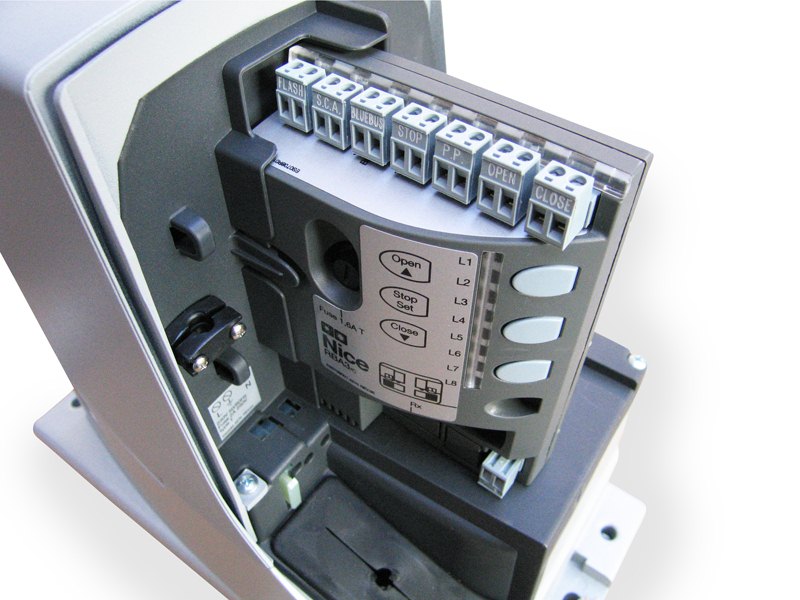 NICE Spinbus is a range of non-reversible electromechanical gear operators for garage doors. They are supplied without a control unit. The compatible control unit is the SNA4. The control units have an SM connector forreceivers radio signals NICE SMXI, or NICE OXI. Electrical connections for external devices (photocells, warning light, etc.) in the NICE Spinbus range of garage door openers were simplified through the use of BlueBUS, which allows multiple devices to be connected to a shared connector using just one two-core cable, with no need to observe polarity. Automatic operation depends on the power supply, but if there is a power outage, the gear motor can of course be released so the gate can be operated manually. You can also purchase an optional NICE PS124 backup battery, which allows the gate opener to operate during a power outage.
Choosing an opener – is the NICE Spinbus SN6041 suitable for my gate?
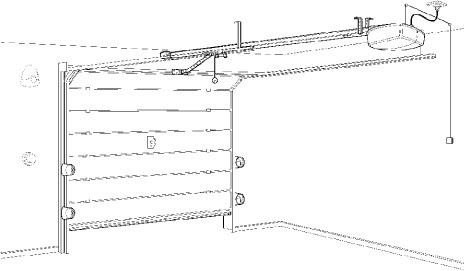
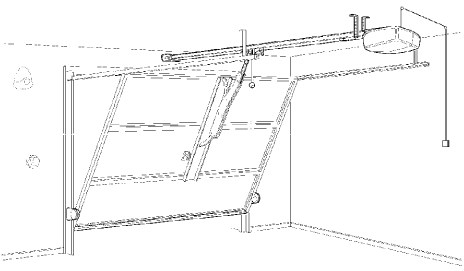
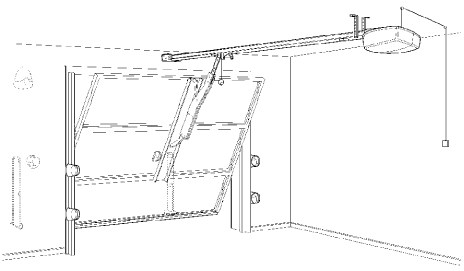
Every gate has its own design (sectional, up-and-over, etc.) and surface area and each opener has its limits. The following types of gates are commonly available on the market:
| Sectional garage door | Non-protruding up-and-over garage door * |
|---|---|
 |
 |
| Protruding up-and-over garage door | |
| without springs* | with springs |
 |
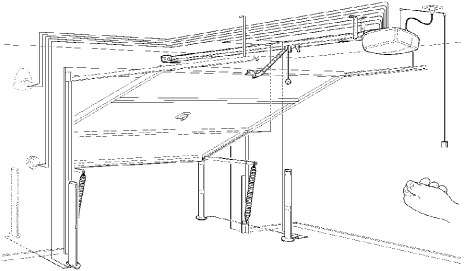 |
* To automate a non-protruding up-and-over garage door or a protruding up-and-over door without springs, you must install on the door NICE SPA5 articulated arm.
Drive unit NICE Spinbus SN6041 when used with the appropriate accessories, is suitable for the following door panel areas and dimensions for each door type:
| Sectional | Up-and-over protruding |
Up-and-over non-protruding |
|
|---|---|---|---|
| max. 17,7m2 | max. 14,7m2 | max. 13,5m2 | |
| 3m guide rail |
2,4m × 5,2m |
2,8m × 4,2m |
2,2m × 4,2m |
| 4m guide rail | 3,4m × 5,2m | 3,5m × 4,2m | 3,2m × 4,2m |
In principle, the door panel dimensions determine the maximum number of cycles per hour and consecutive cycles, i.e. how long the drive can operate. Greater force (weight) further reduces the number of these cycles by a percentage, due to the greater load on the drive, and also determines the maximum permitted speed at that load. The drive is equipped with a device (thermal cut-out) that measures both the motor temperature and the ambient temperature, and reduces the number of possible cycles accordingly:
| Cycles per hour Consecutive cycles |
Force required to raise the door panel* | |||||
| Up to 250N | 250–400N | 400–500N | 500–650N | 650–800N | ||
|---|---|---|---|---|---|---|
|
H
|
Up to 2m |
20 |
18 |
14 |
8 |
5 2 |
| 2–2,5m | 15 7 |
14 6 |
10 5 |
6 3 |
4 2 |
|
| 2,5–3m | 12 5 |
11 4 |
9 3 |
5 2 |
3 1 |
|
| 3–3,5m | 10 4 |
9 3 |
7 3 |
4 2 |
2 1 |
|
* 1Kg=9,81N, i.e. the force required to raise the door panel can also be expressed in kilograms by dividing by 9,81. For example, 500N is approximately 51Kg.
Installing the NICE Spinbus SN6041 drive
Installation method of the drive varies depending on the installation situation. For a gate up to 2.5 m high, use a 3 m guide rail; for a gate up to 3.5 m high, use a 4 m guide rail. The guide rail can also be mounted on brackets attached to the ceiling, or anchored directly to the ceiling using NICE SNA16 brackets.
Wiring
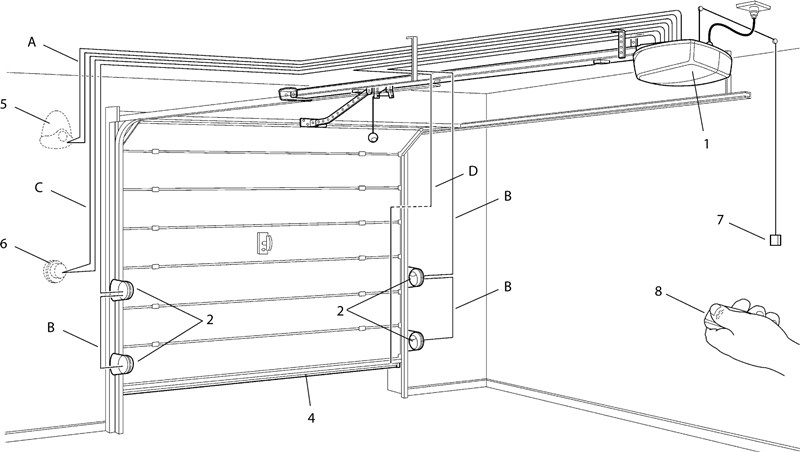
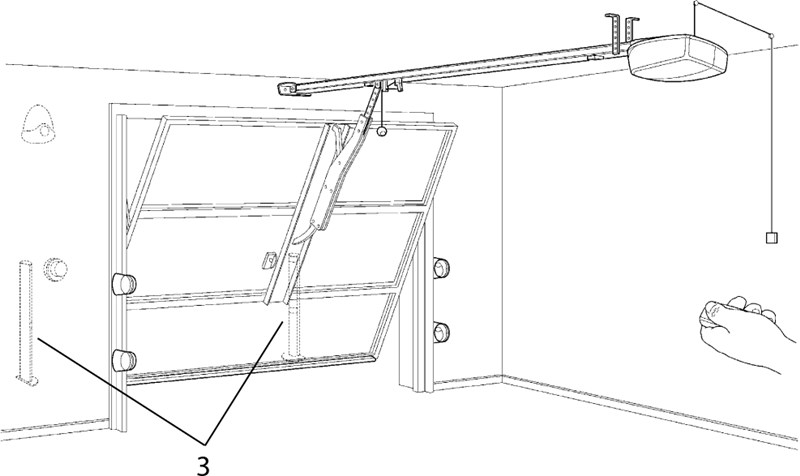
Typical (optional) wiring configuration for the drive and accessories for each type of gate is as follows:
| Sectional garage door | |
|---|---|
 |
|
| Up-and-over garage door with protruding canopy* | Up-and-over garage door without protruding canopy* |
 |
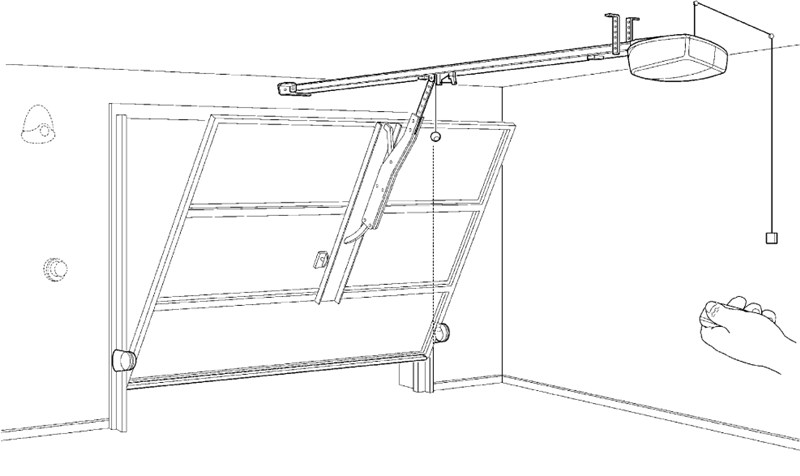 |
* To automate an up-and-over garage door without a protruding canopy, or a door with a protruding canopy and no springs, you must install NICE SPA5 swing arm.
List of accessories
|
|
Wiring list
| Purpose | Type | Max. length |
|---|---|---|
| A. Warning light with antenna |
2×0.5 mm2 |
20 m 20 m (recommended: less than 5 m) |
| B. Photocells | 2×0.5 mm2 | 30 m; over 30 m: 2×1 mm2 |
| C. Key switch | 4×0.5 mm2 | 50 m (or 2 pcs. 2×0.5 mm2) |
| D. Safety edge | 2×0.5 mm2 | 30 m |
Installing the NICE Spinbus SN6041 drive
The mechanical installation of the drive consists of three steps:
- Pre-installation requirements
- Assembling the guide rail
- Attaching the drive to the assembled rail
- Attaching the rail and drive to the ceiling
0. Pre-installation requirements
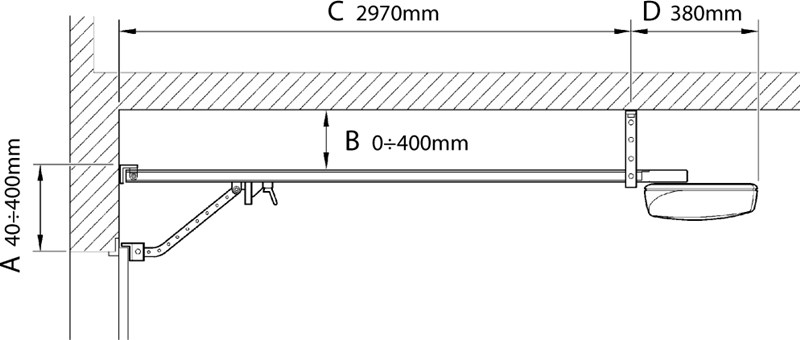
I. The drive requires a certain amount of space for installation, especially around the guide rail. You will need:
- sufficient garage length (C+D) to accommodate the drive (approx. 3.5 m for a 3 m rail, approx. 4.5 m for a 4 m rail),
- the clearance between the top of the door and the ceiling (A) must also be at least 4 cm and no more than 40 cm
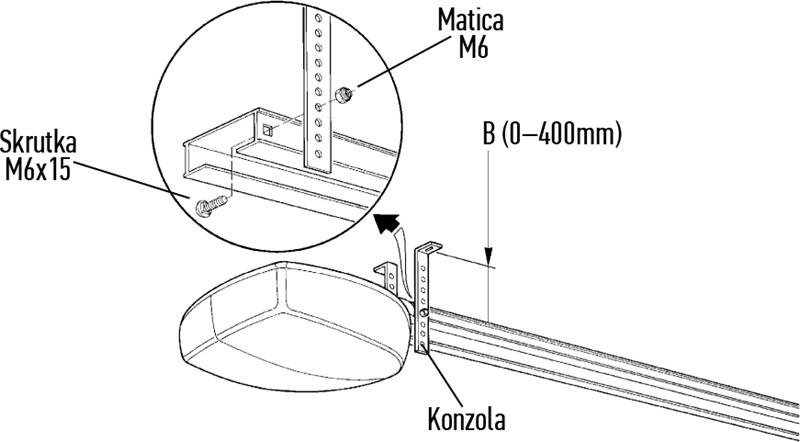
- and the maximum distance between the guide rail and the ceiling (B) should be 40 cm (a shorter distance is fine; the rail can even be mounted directly on the ceiling).
See the illustration for a better idea:
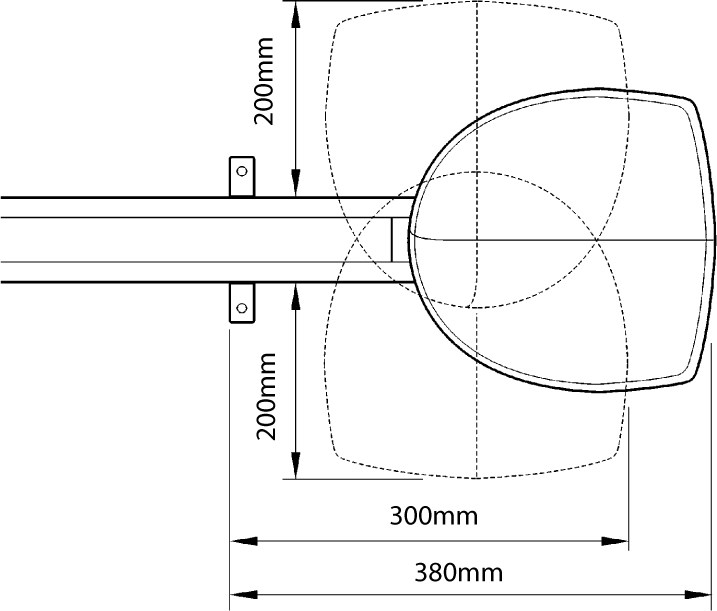
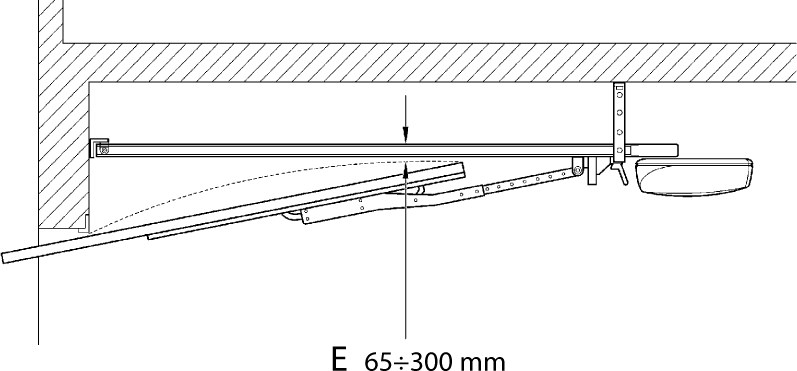
| II. You also need to allow space to install the drive unit itself: | III. For an up-and-over garage door, when opening, the gap between the underside of the guide rail and the highest point reached by the door leaf (E) must be at least 6.5 cm and no more than 30 cm: |
 |
 |
Warning: If the above requirements are not met, the NICE Spinbus SN6041 drive cannot be installed, or an alternative anchoring solution will need to be devised.
1. Assembling the guide rail
Follow the instructions for the rail you have:
| NICE SNA3X (3 × 1 m) |
NICE SNA30 (3 m) |
|---|---|
|
|
|


2. Attaching the drive to the assembled rail
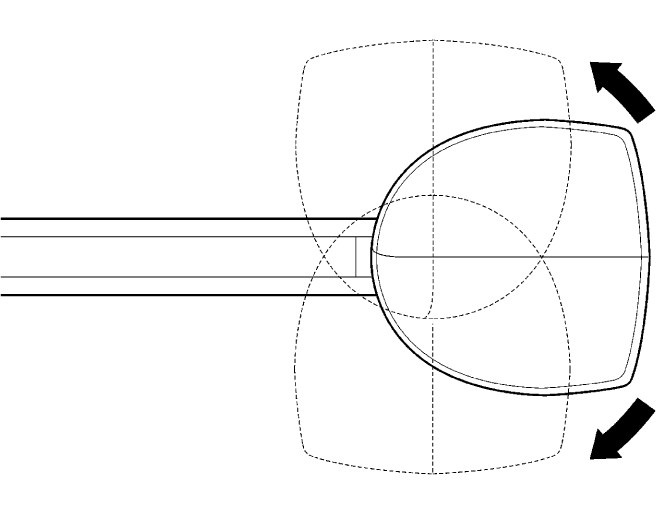
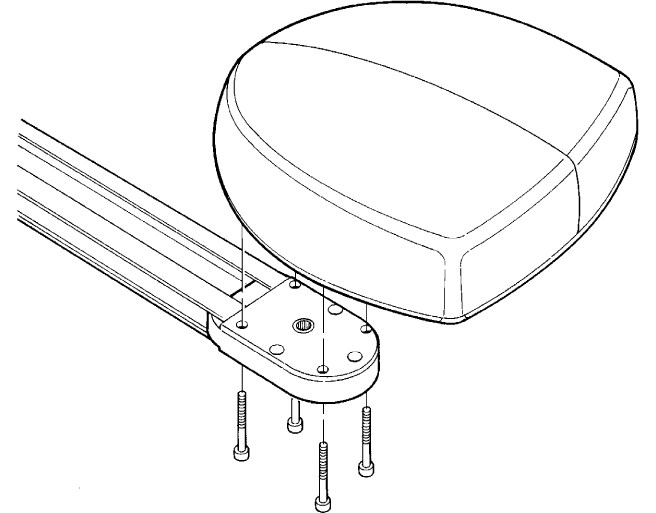
| 1. You can attach the drive in one of three ways, depending on which position best suits the available space. | 2. Attach the drive to the drive-shaft head using the four supplied 6.3×38 screws. |
|---|---|
 |
 |
3. Attaching the rail and drive to the ceiling
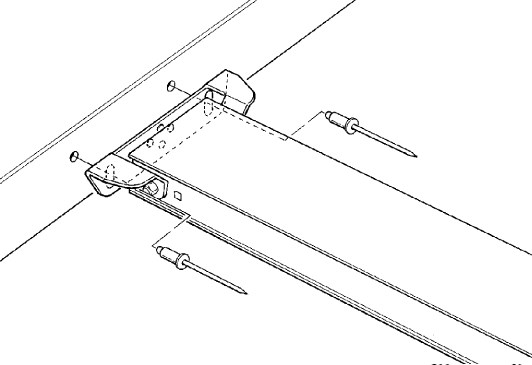
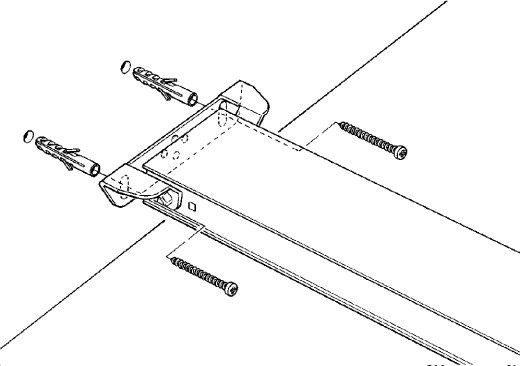
According to the measured values for the clearance between the rail and the ceiling and the top of the gate, mark out two mounting holes exactly in the centre of the gate. Depending on the surface, you can attach the front bracket:
| For a profile, you can use rivets | For a wall, you can use wall plugs and screws | Alternatively, if the conditions are suitable, you can attach the rail directly to the ceiling |
|---|---|---|
 |
 |
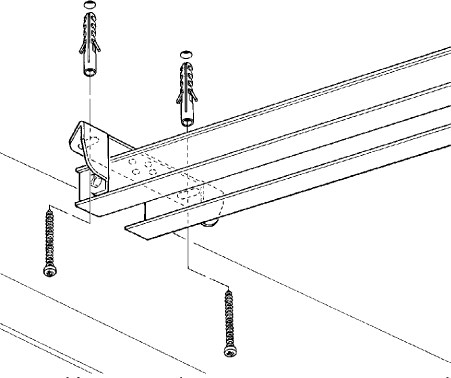 |
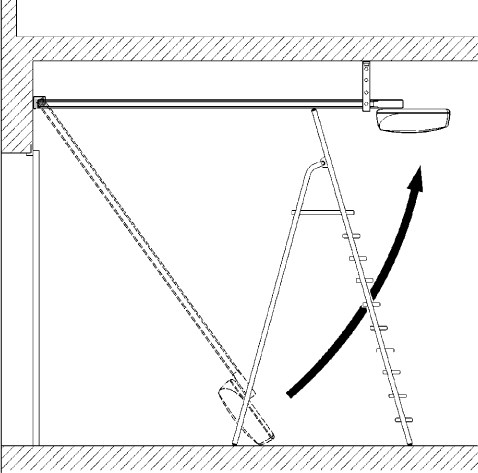
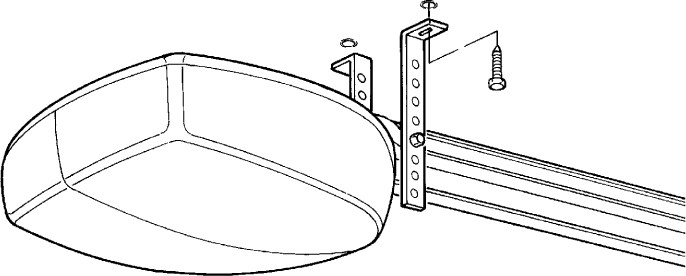
After drilling the mounting holes, attach the front bracket, leaving the other end of the rail with the motor on the ground, then continue as follows:
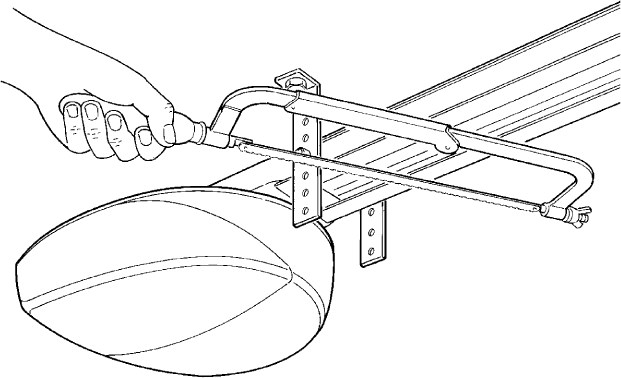
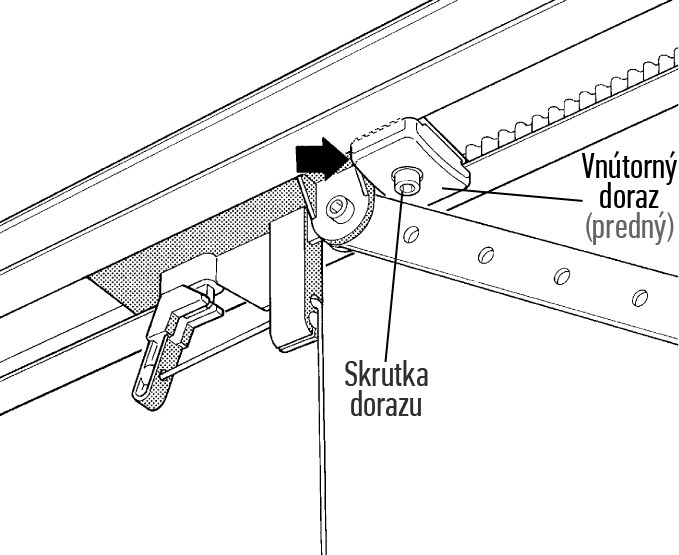
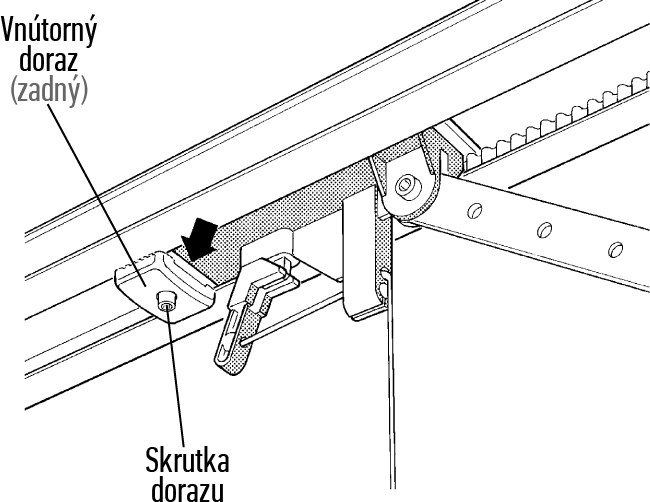
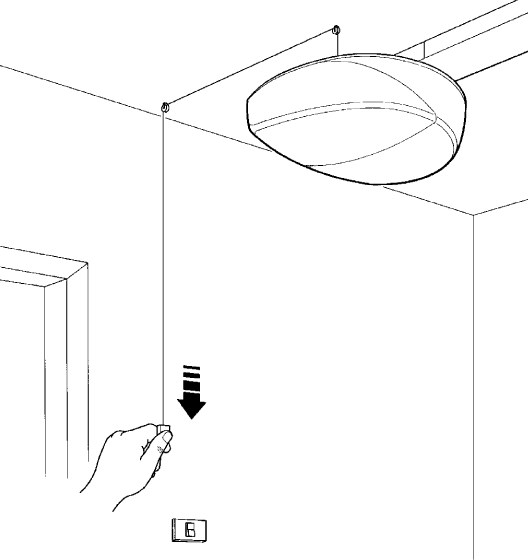
Programming the drive
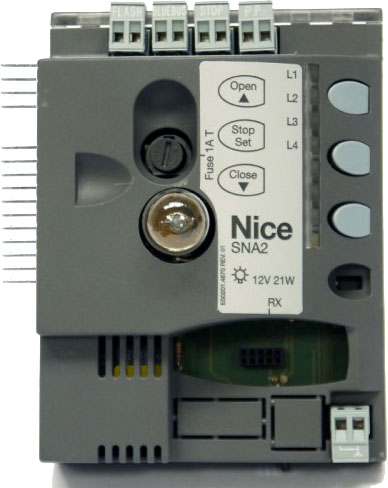
The drive programming procedure depends on the control unit supplied. The following control units are compatible with the NICE Spinbus SN6041 drive:
| SNA4 |
|---|
|
|
Releasing the NICE Spinbus SN6041 drive
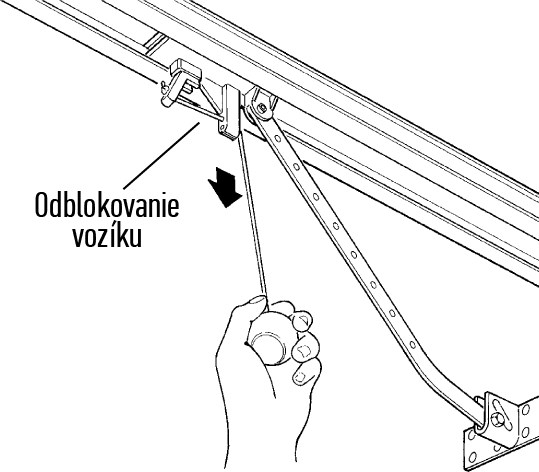
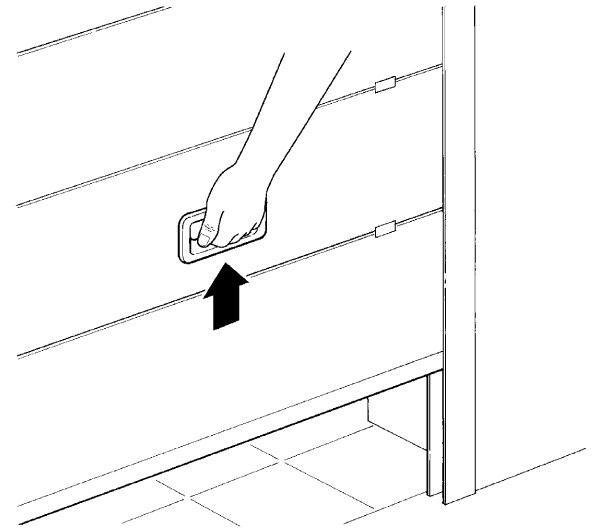
In the event of a power failure, you will not be able to operate the door using the remote control. Therefore, the drive can be released using the release lever and the door can be moved manually:
| 1. Pull the carriage release lever. | 2. Move the door leaf |
|---|---|
 |
 |
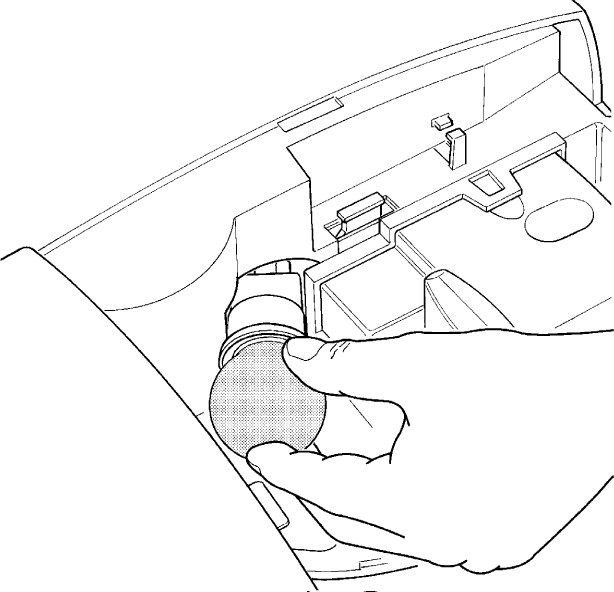
Replacing the bulb in the NICE Spinbus SN6041 drive
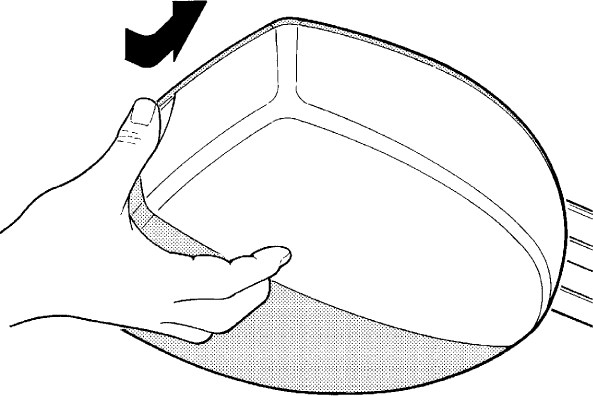
Before replacing the bulb, disconnect the drive from the power supply and follow these steps:
| 1. Press the white cover in and turn it | 2. Unscrew the old bulb. Then screw in a new 230V 60W bulb with an E27 base. |
|---|---|
 |
 |
Technical specifications of the NICE Spinbus SN6041 drive
| Model | NICE Spinbus SN6041 | ||||||||||
|---|---|---|---|---|---|---|---|---|---|---|---|
| Type description | Electromechanical geared motor for automatic operation of garage doors in private settings. Supplied without a control unit. The suitable control unit is SNA4. | ||||||||||
| Gear wheel | Diameter: 9.5 mm Number of teeth: 28 Compatible with rails: SNA3X, SNA30, SNA6 |
||||||||||
| Torque [Force] |
18 Nm [1000 N] - required to start the gate leaf moving |
||||||||||
| Rated torque [Rated force] |
9 Nm [560 N] - required to keep the gate leaf moving |
||||||||||
| Speed | 0.20 m/s | ||||||||||
| Rated speed | 0.08 m/s | ||||||||||
| Maximum number of consecutive cycles | 50 cycles/day (the control unit limits the number according to the restrictions; see Drive selection) | ||||||||||
| Operating limit | 3 minutes (the control unit limits the time according to the restrictions; see Drive selection) | ||||||||||
| Power supply | 230 V (+10% -15%) 50/60 Hz | ||||||||||
|
Power consumption |
370 W (less than 2.2 W in standby mode) | ||||||||||
| Insulation class | 1 - must be earthed | ||||||||||
| Backup power supply | available for purchase and installation NICE PS124 backup battery | ||||||||||
| Lighting | 230 V 60 W bulb, E27 socket | ||||||||||
| Warning light output |
Depending on the programmed output:
|
||||||||||
| BlueBUS output | one output for 6 BlueBUS devices | ||||||||||
| STOP input | for normally open, normally closed and 8.2 kΩ constant-resistance devices | ||||||||||
| STEP-BY-STEP input (P.P., step-by-step control) | normally open (closing triggers the command "Step-by-step") | ||||||||||
| Radio receiver | receiver not included; "SM" connector for receivers NICE SMXI, NICE OXI etc. | ||||||||||
| Antenna input | 52 Ω for RG-58 coaxial cable (or similar) | ||||||||||
| Programming functions | 4 on/off functions (Level I programming.) 4 adjustable functions (Level II programming.) |
||||||||||
| Self-learning functions |
|
||||||||||
| Operating temperature | -20°C to +50°C | ||||||||||
| Use in saline, acidic and potentially explosive environments | no | ||||||||||
| Protection rating | IP40 - indoor use or well-sheltered outdoor use | ||||||||||
| Dimensions | 311×327×105 (w×d×h) | ||||||||||
| Weight | 4.7 kg |
How can I order this item?
Choose the option that suits you:
- order online: use the buy button to add the goods to your shopping cart (you will find the buy button here in the product variants table).
- order by email: place your order at [email protected]