Gate components
Gate components from fortamigo.com
This page features components for manufacturing sliding gates. We offer gate components for cantilever and track-mounted gates, as well as components for suspended gates and doors. Our range also includes NICE gate operators, end caps, locks and components for building fences.
Components for cantilever gates
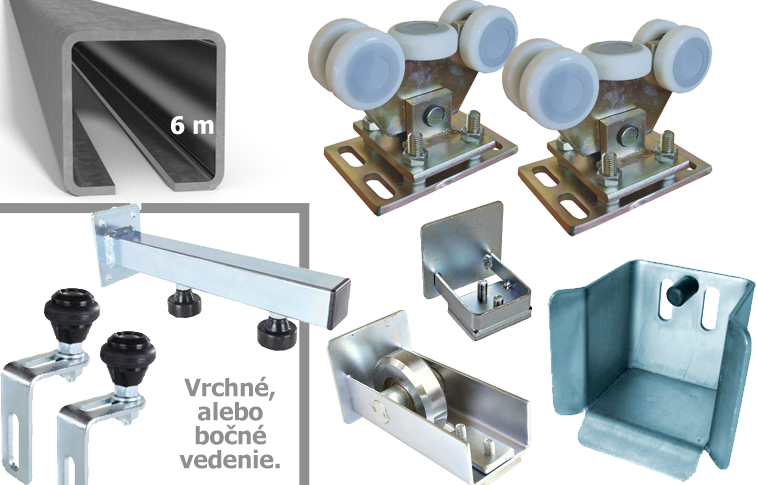
Our components for cantilever (unsupported) gates make it easy to build, or commission the manufacture of, a cantilever gate with a clear opening of up to 15 m. Our range includes various types of support rollers (with different numbers of bearings and load capacities), guide C-profiles, guides, gate stops and all the components needed to build a cantilever sliding gate. For easier selection, the components are grouped into kits offered at discounted prices. The range also includes components for oversized sliding gates.
Components for track-mounted gates Our components for track-mounted (ground-running) gates make it easy to build, or commission the manufacture of, a track-mounted gate with a clear opening of up to 10 m. Our range includes various types of bottom wheels (in different sizes and with different mounting options), tracks, guides, gate stops and all the components needed to build a track-mounted sliding gate.
Components for suspended gates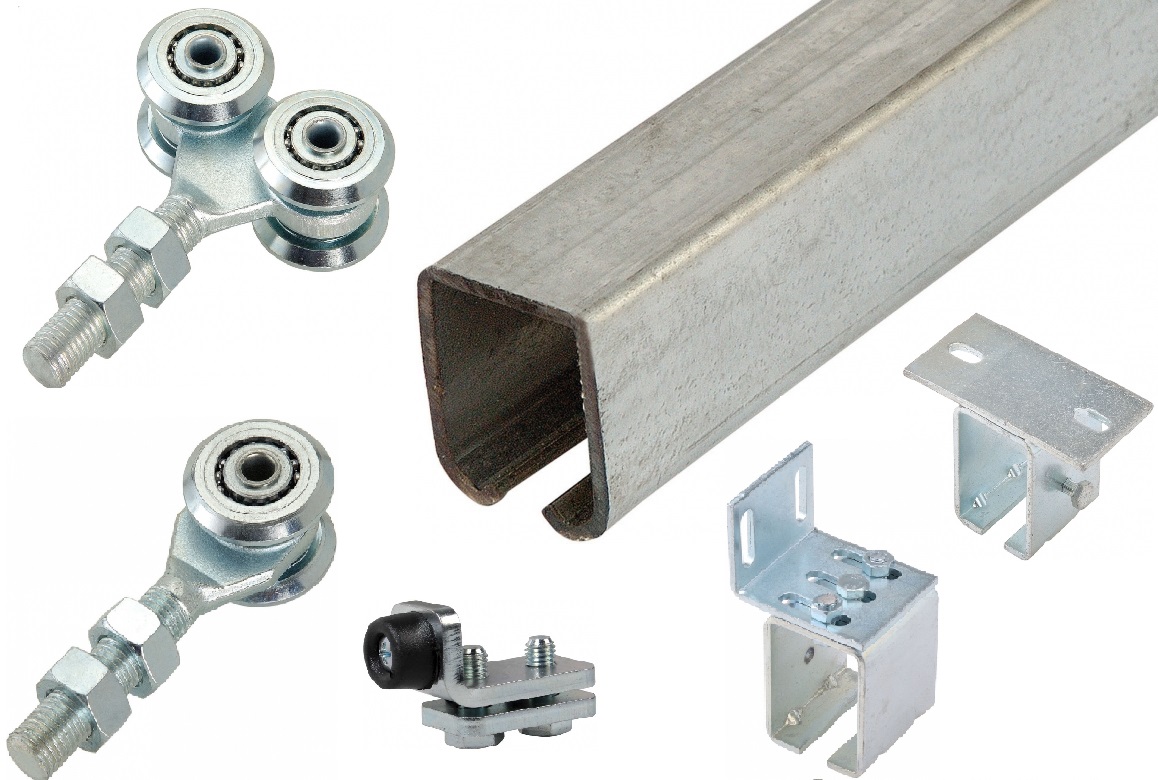 New to our range are components for suspended gates. These components are ideal wherever you need to divide an area with a simple suspended sliding gate or suspended door. The suspension system consists of a guide C-profile, C-profile brackets and bearing carriages to which you can attach the gate or door frame. The guide C-profile and carriages are selected according to the weight of the moving structure. The bottom of the gate can be guided using standard rollers. Often, a U-profile is welded to the bottom of the frame, with one or two rollers running inside it. The suspension system can also be used for overhead conveyors.
Operators for sliding gates Our range of gate construction components also includes sliding gate operators from the Italian brand NICE. This manufacturer is a market leader in home automation. Our range also includes swing gate operators and accessories for these operators.
We'd be happy to advise you on the components you need. You can:
| Fill in the form: | Call: | Email: |
|---|---|---|
| Ask a sales representative for advice | [email protected] |
NICE s.p.a. gate operator manufacturer
IBFM – Italian manufacturer of gate components
Site map:
- Kits
- Gate anchoring
- Gate stops
- Gate guidance
- Operators
- Gate accessories
- End caps
- Track-mounted gates
- Hanging gates
- Structural steel for gates
- Fence components
- Stainless steel, Inox
To get to the point—if you want to build a sliding gate yourself, you’ll need some basic theoretical knowledge of its construction. Let’s take a closer look at the sliding gate:
How a cantilever sliding gate works
The principle of a cantilever sliding gate is to transfer the pushing and pulling forces of the gate leaf to the concrete foundation as it opens and closes. How does it work? Let’s explain it using our favourite method: pictures with captions.
- You have an opening of a certain width that you want to secure with a sliding gate.
- On one side of the opening, pour a concrete foundation
- Fix exactly two sliding gate trolleys
This is the bare minimum needed to install a sliding gate.
- The gate frame is slightly wider than the clear opening.
- You have a load-bearing C-profile
- Weld the gate frame to the load-bearing C-profile and add an overhang
You have now made a standard, simple cantilever sliding gate leaf.
- Slide the gate leaf onto the trolleys set in the concrete.
- Install an alignment post with a gate guide.
- Add the remaining sliding gate components.
What happens next?
- Forces acting on a closed sliding gate
- Forces acting on a half-open sliding gate
- Forces acting on an open sliding gate
Simple as pie, right?
Continue to the technical details cantilever sliding gate foundation, or sliding gate anchoring, or cantilever sliding gate overhang, or read on about our components:
Sliding gate components
Sliding gate construction can be divided into the following categories:
- Sliding gate anchoring
- Sliding gate stops
- Sliding gate guide system
- Sliding gate drive
- Other gate accessories
Let’s take a closer look at each category:
1. Sliding gate anchoring
This category includes three groups of gate components:
- Concrete sliding gate foundation – we don’t supply the concrete foundation, of course :-) The trolleys are set in the concrete foundation, usually along with an alignment post and guide, and possibly the drive if automatic opening is required. Take a look at the page about the sliding gate foundation.
- Trolleys – the recommended way to attach the trolleys to the concrete foundation is to cast in a bracket for threaded rods (or to fasten threaded rods into an existing foundation using a chemical anchor), then securely screw the mounting plate onto them and attach the trolley to the plate. In this setup, the mounting plate serves as an intermediary, making it easier to adjust and fine-tune the position of the sliding gate. Metal or nylon rollers are mounted on the trolley body. They rotate inside the C-profile, ensuring the gate leaf moves smoothly. To choose the right trolley, take a closer look at our page on choosing trolleys for sliding gates.
- Load-bearing C-profiles – The C-profile slides onto the anchored carriages from the outside. The gate leaf moves smoothly as the rollers inside the C-profile turn. We supply C-profiles in various sizes and lengths to suit the required opening width and, where necessary, the weight of the gate. Choose the right C-profile!
2. Sliding gate stops
As it reaches the end of its closing or opening travel, a sliding gate has to stop somewhere—it can’t keep closing or opening forever :-)
The gate stops in three places:
- Bottom stop – also known as a stop pocket, it is fitted at the bottom of the stop post. When the gate closes, the C-profile (ideally fitted with a run-on wheel) enters the pocket.
- Top stop – also known as a gate catcher, it is where the gate itself comes to rest. It can be combined with the strike plate for a sliding-gate hook lock. When closed, the gate rests against the top stop.
These stops typically have a flared entry that allows for precise guidance of the gate into the closed position. See Factors that affect the gate. - Internal stop – it is securely fixed inside the C-profile and stops against the carriage head. It acts as an emergency stop to prevent the gate from sliding off the carriages or, especially during rough manual operation, damaging the stop post. Ideally, fit an internal stop at both ends of the C-profile, or combine this stop with a run-on wheel.
For the bottom stop, it is also worth mentioning that you can install a run-on wheel with an entry roller in the C-profile to ensure it enters the bottom stop smoothly.
3. Guiding a sliding gate
Simply sliding the C-profile onto the carriages is not enough to make the gate move properly. The carriages are not a tight fit inside the C-profile, so the gate needs to be balanced to prevent it from leaning to either side. There are essentially two main ways to balance a gate:
- Side guiding– this option is suitable if the top of your gate has an unusual finish, such as decorative or protective spikes, an arch, and so on. There are two options:
- Balance the gate using at least one roller on one side. For example, if the front of your gate has infill (wooden or plastic fence boards, expanded metal mesh, etc.), weld an L-profile to the back. At least one roller, mounted on an alignment post, will run in the profile.
- Balance the gate using at least two rollers, one on each side. If the gate has a continuous, straight profile along its entire length, fit an alignment post with a roller on each side. The gate will run between them.
- Top guide for a gate – if a second alignment post cannot be used for practical or aesthetic reasons, and an L-profile cannot be welded to one side of the gate for lateral guidance (for example, if the gate has fence boards on both sides), leave a continuous, straight profile along the top of the gate to run between the rollers of the sliding gate’s top guide.
If you’d like to create your own solution, our semi-finished components will come in handy: rollers.
4. Sliding gate drive
Automated electromechanical operation of a sliding gate is a topic in its own right. The gate’s weight is a key factor when choosing a drive. For most sliding gates used at home, a drive for gates up to 400 kg will be sufficient for a gate leaf of this weight. For larger gates, the drive for gates up to 600 kg, or, for industrial use or large gates, the drive for gates up to 1000 kg or more.
The drive works using a rack-and-pinion system. A toothed rack. A drive sprocket is fixed in place on the motor, with its teeth meshing with the teeth of the rack. As the sprocket turns, the entire gate moves.
Optional accessories can be installed with or supplied for the drive:
- Safety photocells – one photocell is normally installed on each side of the opening. They create a beam between them. If the beam is interrupted, the drive receives a signal and prevents the gate from closing. If the gate is already closing, it stops and starts opening. This is useful if your car is in the opening or someone walks through it: the gate won’t hit your car or trap a child.
- Warning warning light – the warning light flashes while the gate opens and closes, alerting passing vehicles and pedestrians that the opening is not clear. In some applications, installing a warning light is even required by current legislation, for example where a sliding gate opens onto a public road.
The gate can be operated in the following ways:
- Remote control – the standard way to open a gate. For example, attach the remote control to your car keys and press the gate-open button as you approach.
- Key switch – open the gate by inserting the key into the lock and turning it. Ideal for gatehouses, for example, or if you need to let a large number of regular visitors through the gate and don’t want to invest in buying, for example, 700 remote controls.
- Code keypad – suitable if pedestrians also use the sliding gate. In this case, it’s best to set the gate to pedestrian mode, so that it opens only about 1 m. Alternatively, the keypad can be used to operate the gate directly from a car window, for example.
- Push button – ideal for home use or gatehouses. A doorbell works in much the same way.
5. Other gate accessories
- Rubber stops – can be used wherever something needs a stop.
- Hook locks – special locks for sliding gates, whose hook-shaped latch prevents the gate from being opened by anyone.
- Handles – give you something to grip when opening or closing the sliding gate manually.
- Lever handles – for opening or closing the gate manually.